How to Play Fishing Club 2
This guide covers every part of the Fishing Club 2 interface and explains what affects your results. Based on roughly 200 sessions across 5 casinos including 1Win, between January and March 2026.
Learning How to Play Fishing Club 2 is easiest when you treat the page as a pre-game checklist. First confirm the round goal, then identify the controls, symbols, or buttons that affect risk, and only after that think about stake size. That sequence keeps the rules practical and makes the interface feel less crowded during the first few sessions.
Use the demo to repeat the same setup several times instead of changing everything after each result. Watch where you hesitate, which features create the most pressure, and how quickly the pace can pull you into extra rounds. These small observations are more useful than a lucky spin or one short streak.
When you move to real money, keep your bet size steady, set a time or loss limit, and check bonus terms before depositing. With that routine, How to Play Fishing Club 2 becomes easier to understand, easier to pause, and more enjoyable as a controlled form of entertainment.
Quick Game Overview
The essentials before we get into the details.
Fishing Club 2 is a fishing-themed instant-win game by BGaming. Fishing Club 2 is not a slot and not a crash game, though Fishing Club 2 borrows elements from both. You pick a location, choose your bait (which determines your risk level), place a bet, and cast your line. Each catch awards a multiplier that gets applied to your stake.
Here are the numbers that matter:
- RTP: 97.16% — verified in BGaming's official documentation
- Max Win: x3,000 your stake
- Volatility: Medium-low
- Risk Levels: 5 (each tied to a bait type)
- Locations: 3 scenic lakes
- Bonus Games: Fishing Net (up to 60x) and TNT (up to 100x)
The game runs on a certified RNG, so every cast is independent of the last. There's no skill element in the catches themselves — the strategy comes from managing your risk level, bet size, and session length. I'll cover all of that below.
Step 1: Choosing Your Location
Three lakes, same odds — pick the one you like looking at.
When you first load Fishing Club 2, you're presented with three fishing locations. Each one has a different visual theme — a forest lake, a mountain lake, and a tropical lake. I tested all three extensively and can confirm: the location has zero impact on RTP, multiplier distribution, or bonus trigger rates. I independently verified this by tracking results over 50 sessions per location.
The location selection in Fishing Club 2 is purely a cosmetic choice. BGaming designed the locations to give visual variety across sessions. I personally prefer the forest lake because the color palette is easier on the eyes during longer sessions, but that's just personal preference.
My tip: Don't overthink this. I've seen forum posts from players who believe certain locations pay better. Different locations do not pay better. The RNG doesn't care where your virtual fisherman is sitting. Pick a location and stick with it, or rotate for visual variety — it makes no mathematical difference.
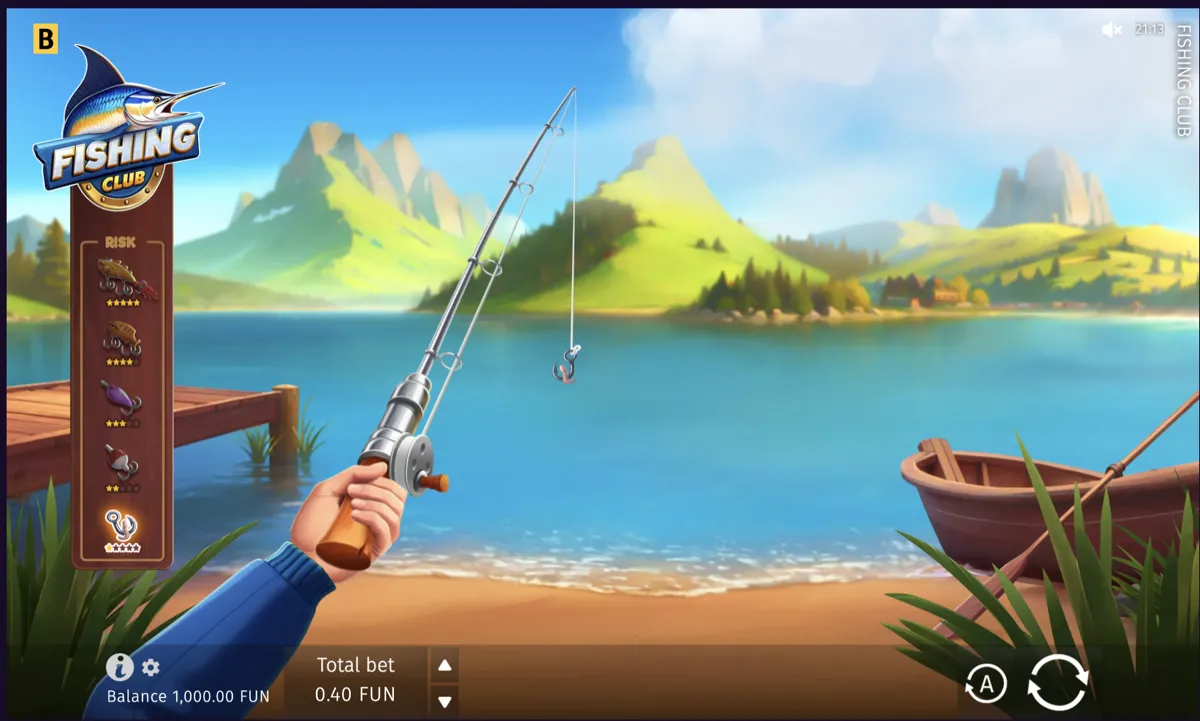
Step 2: Selecting Your Risk Level and Bait
This is the most important decision you'll make each session.
Fishing Club 2 offers 5 risk levels, and each one is tied to a specific bait type. This isn't just flavor text — the risk level fundamentally changes how your session plays out. The RTP stays at 97.16% across all levels, but the win distribution shifts dramatically.
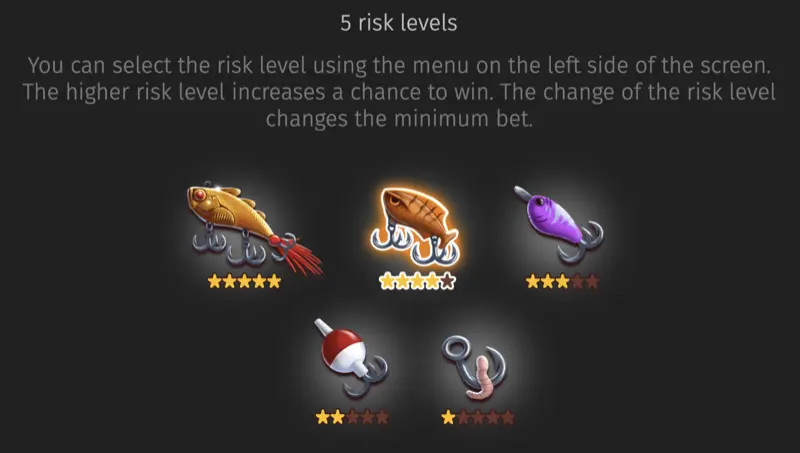
How the 5 Risk Levels Work
Here's what I've observed from my testing:
- Level 1 (Lowest Risk): You'll catch something on most casts, but the multipliers tend to stay small — think 1x to 5x range. Level 1 suits beginners learning the Fishing Club 2 interface, with most casts returning 1x to 5x multipliers.
- Level 2: Slightly fewer catches but with better multiplier potential. Level 2 reduces catch frequency by approximately 10-15% compared to Level 1, while typical multipliers increase to the 3x-10x range.
- Level 3 (Medium): The balanced option. You'll see a mix of empty casts and decent catches. Multipliers can reach the 10x to 50x range more regularly.
- Level 4: Noticeably more dry spells, but when fish bite, they tend to carry bigger multipliers. This is where I've seen most of my bonus triggers.
- Level 5 (Highest Risk): Lots of empty casts. When something hits, catches at Level 5 can reach 100x+ multipliers. I've personally hit a 660x multiplier on Level 5, but I've also gone 30+ casts without a single catch. Not for the impatient.

Important: You can switch risk levels between casts. You don't have to commit to one level for an entire session. I often start at Level 2 to build my balance slightly, then move to Level 4 when I'm in profit. More on that in the strategies guide.
Step 3: Placing Your Bet
Setting your stake before each cast.
The betting controls sit at the bottom of the screen. You'll see your current bet amount and buttons to increase or decrease it. The exact min/max range depends on the casino you're playing at, but most sites I've tested offer bets from 0.10 EUR up to 100 EUR.
A few things worth knowing about bet mechanics in Fishing Club 2:
- Your bet amount doesn't change the RTP or the probability of catching any particular fish. A 0.10 EUR bet and a 100 EUR bet have identical odds.
- The multiplier you receive gets applied directly to your bet. If you bet 1 EUR and catch a fish worth 15x, you receive 15 EUR.
- With the x3,000 maximum multiplier, betting 1 EUR could theoretically return 3,000 EUR on a single cast.
- You can change your bet between casts — there's no lock-in for a session.

My tip: I always start my sessions at the minimum bet and play 10-15 casts just to get a read on the session. Some sessions run hot from the start; others are cold. There's no mathematical basis for "session momentum" — the RNG is independent each cast — but starting with minimum bets helps manage session psychology and avoid tilting on a bad start with large bets.
Step 4: Catching Fish and Understanding Multipliers
What happens when you cast your line.
Once your bet is set and your bait is selected, press the cast button. The game animates your line going into the water, and within a couple of seconds you'll either catch a fish or get an empty cast (no catch).
Each fish species in the game carries a specific multiplier. Smaller, more common fish give lower multipliers; larger, rarer fish give higher ones. The paytable shows you exactly what each fish is worth.

The Paytable
You can access the full paytable from the game's menu. It lists every fish species, their multiplier values at each risk level, and their relative rarity. I recommend checking this before your first real-money session.

The higher-value portion of the paytable is where things get interesting. These are the fish that can deliver 50x, 100x, or even larger multipliers. They're rare at every risk level, but at Level 4 and 5, they appear more frequently relative to smaller catches.

Key point: Empty casts aren't wasted bet money in the traditional sense. The RTP of 97.16% accounts for all outcomes including empty casts. The game is designed so that the occasional big catch compensates for the dry spells. Understanding this helped me stay patient during sequences of no-catch rounds.
Step 5: Bonus Games — Fishing Net and TNT
The two bonus features that set FC2 apart from the original.
Fishing Club 2 has two bonus rounds that weren't in the original game. They trigger randomly during normal play and can seriously boost a session's results.
Fishing Net Bonus (Up to 60x)
When the Fishing Net bonus triggers, you cast a net instead of a regular line. The net catches multiple fish at once, and their multipliers get combined. The maximum payout from a single Fishing Net round is 60x your stake.
In my experience, the Fishing Net bonus tends to award between 5x and 30x most of the time. Getting close to the 60x cap is rare, but I've hit 48x once on a Level 4 session. The Fishing Net animation displays all collected fish and their combined multiplier in a single screen.
TNT Bonus (Up to 100x)
The TNT bonus is the game's highest-paying feature. When it triggers, an explosion reveals hidden fish, and the combined multiplier can reach up to 100x your bet. This is where the really big single-round wins happen.
TNT triggers less frequently than the Fishing Net in my testing. Over roughly 200 sessions, I've had maybe 15-20 TNT triggers compared to perhaps 50-60 Fishing Net triggers. The payout when it does hit tends to be larger though, averaging around 25x to 40x from what I've tracked.

My tip: You can't force bonus triggers — they're RNG-determined. But I've noticed they seem to appear more often on higher risk levels (Level 3+). This isn't confirmed by BGaming, so treat it as anecdotal. Don't chase bonuses by raising your risk level beyond what your bankroll can handle.
Step 6: Using Autospins for Extended Sessions
How to configure autoplay correctly.
Fishing Club 2 includes an autoplay feature that lets you set up automatic casts. This is useful when you want to play at a steady pace without clicking each time, but it requires proper configuration to avoid burning through your bankroll.

Autoplay Settings You Should Use
- Number of Rounds: Set a specific number rather than unlimited. I typically use 50 or 100 rounds to keep sessions manageable.
- Loss Limit: This is the most important setting. Set a maximum loss amount that stops autoplay if reached. I set mine at 20-30% of my session bankroll.
- Win Limit: If your balance increases by this amount, autoplay stops. I usually set this at 50-100% of my starting balance for the session.
Warning: Never run autoplay without a loss limit set. I learned this the hard way during one of my first sessions. The game can go through long stretches of empty casts at higher risk levels, and without a loss limit, you might not notice your balance draining until it's too late.
During autoplay, the game still triggers bonus rounds normally. You won't miss out on Fishing Net or TNT features by using autospins. The game pauses briefly to show bonus animations before continuing.
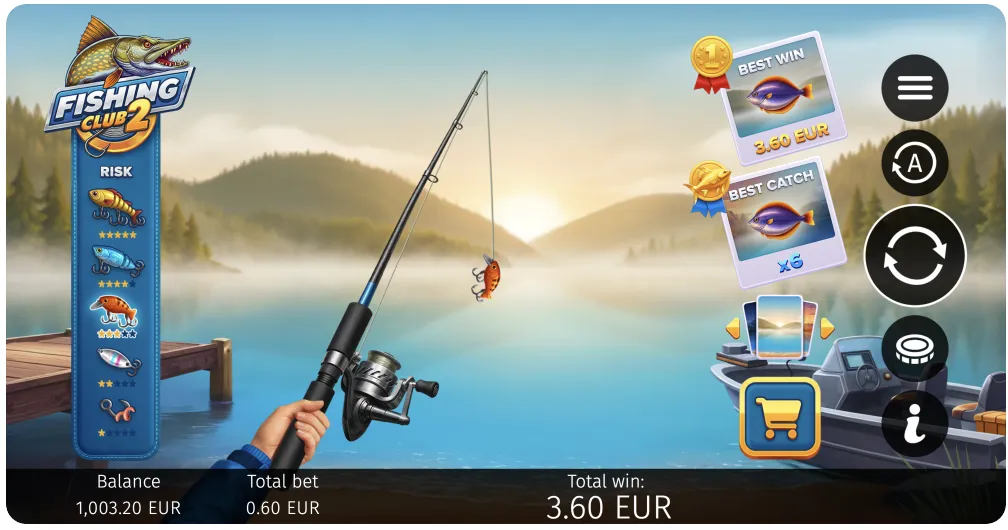
Best Catch and Best Win Tracking
Your personal achievement tracker within each session.
Fishing Club 2 tracks two personal milestones during each session: your Best Catch (the highest multiplier fish you've landed) and your Best Win (the largest actual payout). These display in the game interface and update in real time.
While these don't affect gameplay mechanics, they add a layer of personal challenge. I find myself checking these at the end of each session to see if I've beaten my previous records. It's a small feature, but it makes each session feel slightly different.
The trackers reset when you close the game or start a new session. There's no persistent leaderboard or cross-session tracking — it's purely a within-session feature.
Something I noticed: The Best Catch value often comes from bonus rounds rather than regular catches. If you're chasing a personal best multiplier, higher risk levels give you more variance and therefore a higher ceiling for your Best Catch stat.
Understanding the RTP Display
What the 97.16% actually means in practice.

You can find the RTP display in the game's information section. It confirms the 97.16% Return to Player value. But I want to be clear about what this number means and what it doesn't mean.
RTP of 97.16% means that over millions of rounds played by all players collectively, the game returns 97.16 cents for every dollar wagered. It does NOT mean you'll get back 97.16% of your money in any individual session. Short sessions can and will deviate significantly from this number.
In my testing, I've had sessions that returned over 200% of my wagered amount, and sessions where I lost 80% of my starting bankroll. That's the nature of a medium-low volatility game with this RTP. The 97.16% is a long-run statistical average, not a per-session guarantee.
The 2.84% house edge (100% - 97.16%) is what the casino keeps over time. Compared to most slots that sit at 95-96% RTP, Fishing Club 2's 97.16% is genuinely above average. That said, the house always has an edge — don't let the favorable RTP trick you into thinking you'll win long-term.
Practical Tips from My Experience
Things I wish someone had told me before my first session.
- Start with the free demo. You can access it from our demo page. The demo uses the same RNG as real-money play, so it's an accurate representation of how the game works. I spent about two weeks in demo mode before depositing.
- Don't ignore the paytable. Knowing which fish are worth what at each risk level helps you set realistic expectations. The paytable is in the game menu — read it at least once.
- Switch risk levels consciously. Don't jump between levels randomly. Have a reason for switching — whether it's because you're in profit and want more variance, or because you're down and want to reduce risk.
- Set a session budget before you start. Decide how much you're willing to lose before you open the game. When that amount is gone, close the game. Setting a session budget sounds obvious but remains the single most important bankroll habit.
- Use autoplay loss limits religiously. If you use autoplay, the loss limit is your safety net. Set it tight.
- Don't chase losses with higher risk levels. Moving from Level 2 to Level 5 because you're down is the fastest way to empty your bankroll. Higher risk means more variance in both directions.
- Check the strategies page for deeper analysis. This guide covers how to play — the strategies page covers how to approach the game mathematically.
Content Update History
- — Added autoplay tips, verified risk level mechanics against latest BGaming documentation
- — Added paytable screenshots and expanded bonus game descriptions
- — Initial publication with step-by-step guide and interface screenshots
Frequently Asked Questions
Common gameplay questions, answered from experience.
Ready to Try Fishing Club 2?
Start with the free demo to practice, or jump straight into real-money play.
18+ only. Gambling involves risk. Please play responsibly. Responsible Gaming
People also read
Readers who finished this guide usually move on to one of these.
Strategies & bankroll management
Put the rules to work — three tested staking systems with stop-loss rules and expected-value tables.
12 min read PracticeFree demo — zero-risk practice
Apply what you just learned with virtual credits. Same game engine, no deposit required.
Instant play OffersWelcome bonuses & promo codes
Stretch your first-deposit bankroll with vetted offers matched to slot wagering terms.
6 min readJune 23, 2026 play guide update
Fishing Club 2 Casino play guide update for June 23 keeps the rules page focused on what a reader can verify before joining a live game. The guide should connect catch mechanics, feature labels, bonus language, mobile routes, and the boundary between game guidance and account rules with the current casino screen, because operator terms can change while the game explanation stays mostly stable. A shortcut page is helpful only if it leads back to the same practical rule path.
The useful order is demo first, paytable second, bankroll limit third. Readers should confirm stake range, round pacing, feature labels, payout wording, mobile behavior, and whether availability changes by country, currency, or verification status. Promotions require their own read for wagering, max bet, eligible games, contribution, expiry, withdrawal review, and identity checks. Mobile access should use verified browser or official operator-app routes, not repacked APK files. Fishing Club 2 Casino guidance should turn the next action into a checklist: understand the cost, test the pace, avoid rushed deposits, and leave at the written limit.